Tags
Craft, DIY, Home, Spray-paint
Okay, so, I have this little problem, and it’s very, very annoying! It’s this little vent over my couch in the living room. Really, it’s the whole wall behind my couch. It’s all out of whack. I mean, the whole thing is uneven. Part of the wall is built out, but it is not symmetrical. I have this thing about everything being symmetrical, and it’s driving my nuts!

Our neighbors next door have the same floor plan as we do. They have the same dumb built out wall as we do, but their’s is symmetrical. I think whoever built our house must have cut twice and measured once… or something… They just didn’t get it right. Arrrggg!
Anyhoo! See this vent at the top of the wall? (Who would put a vent at the top of a focal wall like that!?!)

It’s a big eye sore to me. Okay, it’s not just the vent, it’s the whole wall thing again… But, I have to start somewhere. We’ve been in this house over 5 years now, and I, still, have not touched this wall. (It’s sad, I know…) I just can’t get over the unsymmetricalness of it, so I have chosen to ignore the wall… until now.
So, I’m starting with the vent. If it’s got to be there, it needs to be pretty, right?

You’ve seen what people do with T-P rolls… Well, these are paper towel rolls. I used about 47,000 rolls, cut into 16 pieces each. (Okay, not really that many rolls, but it felt like it when I was all done. This little craft took me way longer than I thought it would. I only used about 6 rolls cut into 16 pieces.)
I worked this out in sections (I ended up with seven sections).
For the first section, I started out with 1 piece and I pressed it down flat, then I turned it over so that the folded sides touched and pressed it in the other direction so that the little circle now looked like a square.

For the rest of this section, I cut one side, of 8 different pieces like this…

Next, I turned the square, that I had shaped, sideways so that it was now diamond-shaped, and glued 2 cut pieces on the top of the diamond like this…

And then, coiled them with a pencil inward, to resemble a heart, like this…

For the sides of the diamond, I glued two more cut pieces on each side. One piece directed to the top and one directed down.


The top piece, I coiled inward toward the heart, and I did the same for the bottom piece…

Then, I glued the top pieces together, and the bottom pieces together.

After I did my first section, I decided it was faster to coil first and then glue.

Your first section should look something like this…

(You may have to play around with it to get it in the shape that you want.)
I made seven sections just like this one, and I glued each section together with another square diamond in-between each section.

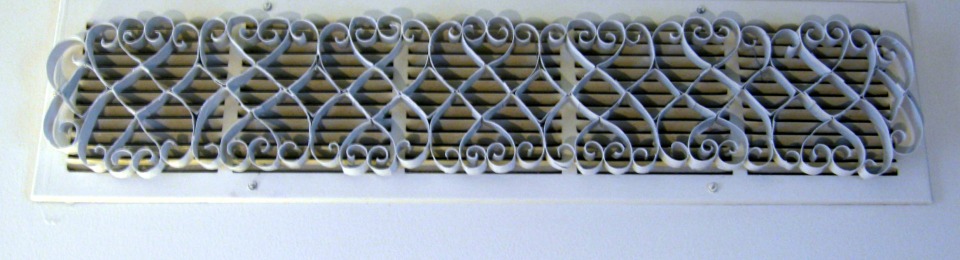
After all the glue was dry, I spray painted it to match my vent, and hung it up with Christmas hooks. Yeah, I’m creative that way. 😉
Here’s the before again…

And, after…

Much better.
Have a great rest of the week!

Linked to these parties.

Wow! What a creative idea. And a fun solution to your weird wall vent problem! 🙂
I’m glad I found your blog today – lots of inspiration here!
Thanks Suzanne! You are so kind! Thanks for visiting! 🙂
I thought it was metal until I scrolled down further! So creative!
Thanks Diane! Thanks for visiting! 🙂
A am IMPRESSED!! I thought you had it made for you. No one will ever know that is home made out of papertowel rolls. I envy you. I do not have a creative bone in my body.
Thanks Cynthia, you are so kind! Thanks for visiting! 🙂
That really looks grate – I mean, great! I thought it was a vintage piece. You have such patience to craft something so tedious. (And I know what you mean about symmetry!)
LOL! Thanks Kathijanet! Thanks for visiting! 🙂
OMGosh, I am such a symmetry girl, I think your Before pic might have given me hives!!! You poor thing! what WERE they thinking!? You did a great job in camouflaging the vent. Well done!
Thanks Vivienne! Thanks for visiting! 🙂
How creative!!
Thanks Donna! Thanks for visiting!
That’s amazing ! The vent looks so much nicer. I love all your posts. Always something new and exciting at your home .. never a dull moment 🙂
Thanks Marcy! You are so kind to me! 🙂
Wow that was a lot of work, but it looks grate. ha ha. I am a nerd. Thanks for linking up with DIY under $5!
LOL! Michelle, you are the second person to say it looks grate! 🙂
Such a cute idea! Perfect way to make the unsightly look prettier! 🙂
Thanks Shannon! Thanks for visiting! 🙂
Um, holy cow! This is amazing. It almost makes me wish I had a randomly placed vent cover. Darn it!
Thanks for linking up. This is seriously great.
Thanks Erika! 🙂
Love the idea, love the design, LOVE the result!
I would love for you to link up my my very first Fresh Friday Link Party!
http://www.releasemecreations.com/2011/10/fresh-fridays-link-party.html
Thanks Maureen! 🙂
What a creative solution to your vent problem — you turned an eyesore into something beautiful! Love it!
Thanks Amanda! Thanks for visiting! 🙂
Well done for persevering. Your vent looks so much better now and I am glad that your wall is easier to look at now!
Thanks Karen! Thanks for visiting! 🙂
I think you started a revolution! This might be the cleverest idea I’ve seen!
Thanks Glenda! You are too kind! 🙂
Cute idea! Inexpensive too! I love those kinds of projects! I have the same problem, actually. Plus, our thermostat is right below it. It has been difficult to decorate!
Thanks for visiting, Stephanie! We have a thermostat on that wall too! It’s so annoying, isn’t it? 🙂
what a great idea!
Thanks Julianne! 🙂
That is sooooo clever! It looks like wrought iron! I am super impressed with this project and we are so glad you shared it with us at Inspiration Friday this week!
Vanessa
Thanks Vanessa! 🙂
So totally cool! Great job…def pinning this!
Thanks Laurie! Thanks for visiting! 🙂
Nice addition! Thanks for linking to Things I’ve Done Thursday.
Melanie
bearrabbitbear.blogspot.com
Thanks Melanie! 🙂
Great cover up of av ugly vent. It looks fabulous!
Thanks Kimberly! Thanks for visiting! 🙂
What a clever idea, I thought it was metal. Great idea and cost effective too. Laura Cottage and Broome
Thanks Laura! Thanks for visiting! 🙂
Wow that is prettier. We’ve got these crazy vents on focal walls too. I totally thought it was metal before I read your post!
Thanks Emily! Thanks for visiting! 🙂
that is such a cute idea!
Thanks for visiting, Kat! 🙂
I hate all the ugly vents they put in houses. They really are eye sores. I love what you did to yours. Awesome idea! Thanks so much for linking up and sharing:>
Thanks Danielle! 🙂
Looks great!!!!
I am SOO doing this!! Thanks for the inspiration. We are getting ready to move into a log cabin that doesn’t have very many normal drywalled walls. So where ever there is a normal wall, HVAC vents have been placed with no logic to their placement.
BTW, saw you at TT&J
Glad you liked the vent cover. Have fun making your’s, Kristol! 🙂
AWESOME idea!! 🙂
Thanks Rachael! 🙂
My guess is that the guys who did the drywall at your house when they built it were DRUNK! lol Love the new look!
Angela, the thought did cross my mind… 😉 Thanks for visiting!
Nice FIX!!!
Thanks Patti! 🙂
Very clever! I’m also trying to figure out how to hide the large return vent to my air conditioner. Unfortunately I don’t think this would work for me, because mine is down low at the floor in a very high traffic area. Yours looks great, though!
Thanks Kristi! I don’t know why builders don’t come up with a better way for air to flow through our houses! Hope you find something that works on your grate. Thanks for visiting! 🙂
Good beginning on that unbalanced wall. Something interesting is now ON the wall over the vent. Good one.
– Joy
Thanks Joy! 🙂
I totally thought it was metal!! That is fantastic!! Just might have to do this in my girls’ rooms!!
I found via iheartnaptime’s linky party!!
~ Lisa
momdad2girlsandbrutus.blogspot.com
Thanks for visiting, Lisa! 🙂
How Clever! here when I first saw this, I thought you
were so smart to put a fancy metal grate over the vent,
then I realized You Made it with TP rolls ~ Awesome!
Thanks Cheryl! 🙂
Well I love it and if you could create something so intricate and ornate from paper towel rolls, you have absolutely no excuse for not embracing your assymetrical wall and doing something fantastic with it! You’re so creative — just emphasize the assymetry!
LOL! You are so right Lauren! I have been getting better about everything needing to be symmetrical. (I kind of have to with this wall! LOL!) Thanks for your encouragement! 🙂
Oh my goodness, what an undertaking this was. Must have taken forever but you did a terrific job of cammoflage…well done! If you can do all that with tissue rolls, you could probably get a ticket as a sheet metal working, cutting out tin…Kudos to you. I have joined you on Pinterest and invite you to join my followers list; as well,I hope you will grab a blog button. Hugs, Gayle
http://atastefultouch.blogspot.com
Thanks Gayle, you are so kind! 🙂
That was nothing short of brilliant. I love that you just used cardboard. So pretty great job.
Thanks Sandie! 🙂
wow that is incredible! lovely result for some patience and effort!
Thanks Amber! Thanks for visiting! 🙂
OMG! That is amazing. What is most impressive it the reuse of the paper towel tubes. I’m always looking for great way to put them to use, thank you!
I came here from the “Homemaker on a Dime” site because this is such a great idea for our Linky Party too this week. The theme is ‘Creative Final Resting Place Ideas’ this time.
Would you like to add your post to our site? We’re somewhat new, yet getting good traffic already and ranking very well for the search engines.
We’d love to host your ‘link’ there this week too!
Pam Hoffman
Thanks Pam!
THAT is pretty stinkin’ amazing. I thought it was a metal grate that just happened to be the right size. What a great project.
Thanks Kim! Thanks for visiting! 🙂
that’s awesome. so pretty and never in a million years would i guess that it was made from toilet paper rolls!
Thanks Kellie! You are so kind, thanks for visiting! 🙂
wow what a cool idea. it looks so much prettier that way. Thank you so much for sharing and for linking up to last weeks show and share. We hope to see you and your newest project on Wednesday.
A mommy’s life…with a touch of YELLOW
tyandwhitneyulrich.blogspot.com
Thanks Whitney!
That really is beyond creative, however did you get that idea. You must have a lot of patience. Great job. Thanks so much for sharing at Sunday’s Best. Inspiration is always a good thing.
Thanks Cathy! You are so kind! 🙂
Neat idea!! Take it a little further though. If you don’t like the fact that the wall isn’t symetrical, make it so. A suggestion would be to hang several pieces of art work or family pics or a combination on that wall. Make the pics/artwork the focal point. The grate cover is a great start! Try using darker frames and paint the outer frame of the vent about the same color so that it fits in. With your really cool grate cover inside the frame it will look like artwork that has been hung intentionally! Also, since the vent is upper right, put something shaped similarly (doesn’t need to be as big) on the lower left to help with symetry. Make the vent a part of the collection on the wall. What do you think? I have a pic in my head of what it would look like and looks like it would work to me 😀
Sally, that is a great idea! I love it! I will have to work on getting pictures and frames to do this project. Thanks so much for the advice! 🙂
I hope it works out well for you…be sure and put up a pic when you are done!!
Thanks Sally, I will! 🙂
Stephanie…this is seriously fantastic! Wow! Thanks for sharing this and I will be featuring this Saturday!
Thanks Tonia! Glad you liked it! 🙂
What a cute idea! Very creative you are…XoXo
Thanks Katie! 🙂
Very creative great job!! We have a couple things in our home that I always wonder what they were thinking when putting it in! So glad you linked up with us at Show & Share!
Marie
mylilpinkpocket.blogspot.com
Thanks Marie! 🙂
Oh my!!! You did that with paper?? You’re superwoman hahaha. It looks really good!!
LOL! You are funny! 🙂 Thanks Anabella!
We musta had the same dern builder… I’ve got a stinkin vent right where a light should go in the kitchen…right above the sink.. What a dim-wit!
Super-duper use of those superfluous TP Rolls! It looks FAB!
LOL! I feel your pain! 🙂 Thanks for visiting, Gwen!
I featured this tutorial in my “Top Ten CRAFTS I loved this week #3”.
It’s an awesome tutorial!!!
Thanks!
http://cosiendoycriando.blogspot.com/
PS:It is also a linking party, so you can link up another craft!!
Thanks Anabella! Glad you liked it! 🙂
This vent cover that you have made from toilet paper tubes is absolutely amazing! If I didn’t know better I would think it was a heavy metal piece. I hope you don’t mind, I just couldn’t help but feature your vent cover on my toilet paper roll craft round-up hub here:
http://jamiebrock.hubpages.com/hub/Clever-Crafts-Using-Toilet-Paper-Rolls
Thank you so much for sharing!
Pingback: Crafting a Green World | The home for green crafts and tutorials!
Pingback: 50 DIY Toilet Paper Roll Crafts You Need to See! | hometips.co.za
Pingback: 51 Toilet Paper Roll Crafts + $25 Walmart Gift Card Giveaway
Pingback: Clever Crafts Using Toilet Paper Rolls | EUOA
li seu blog, adorei demais do seu blog! vi que o
conteúdo muito bem alinhado. Tenho um blogue no mesmo assunto e
gostaria de ver se você tem alguma sugestão para quem
está começando a escrever blog sobre este tema.
abraços!
Pingback: 20 Toilet Paper Roll Crafts – Diys To Do
Pingback: 15 Extrem kreatives und einfaches Basteln von Toilettenpapierrollen - De.Chromeonlinegames.com - Super DePins
great idea! Just moved into an apartment that has a 5 foot tall 2 foot wide heater vent in the middle section of the wall but it’s just off center so I was looking for creative way. We don’t use it. We don’t turn on the heat. It’s too hot here in San Diegoand I saw your picture. I thought what a great idea so I’m gonna go down to the store and see what’s available. I’m not as creative as you, but I’ll go see so much you help a lot of people Cindi Fagan.