Several years ago I made some light-bulb snowmen as gifts for friends and family. I also made a couple for us to keep, one with each of my kids names on them. Now that we’ve added two more kidos to our brood, I thought I should make a couple more snowmen to complete the set. 😉

I also made one for my daughter’s piano teacher…

I started out by spray painting the light bulbs flat white. I sanded the light bulbs to give them a rough finish so the paint would stick better. (Okay, I won’t lie… I didn’t sand them at first, but then had to go back and sand them, after the first coat of paint kept peeling off. Trust me, sand first! :))
To paint the light bulbs, I used a pizza box with little “X” cut into the box. Then, I “screwed” in my light bulbs into the little “X”.

My son, Jonathan, asked me when I was going to turn the lights on. (He’s three. :D)
Then I took my light-bulb laden box out to the garage to paint. I covered the floor with taped-together-trash bags (classy, I know…) and went to town with my spray can. After about 3 coats of paint (letting the paint dry in between coats), I turned the bulbs a ¼ of a turn to make sure the bulbs were evenly coated, and then added a couple of more coats.

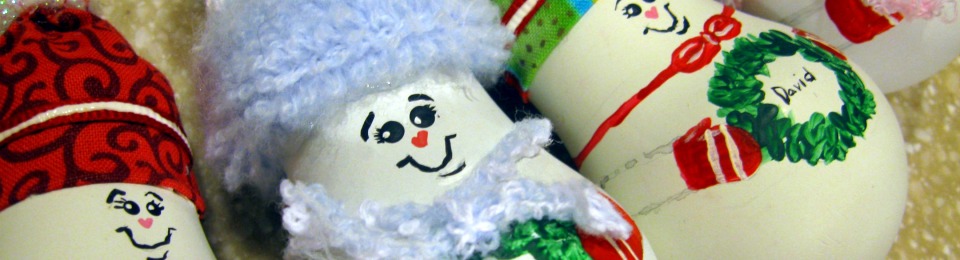
After the bulbs were dry, it was time to dress and paint little faces on the snowmen.
First, I added some ribbon to hang the snowmen. I tied the ribbon around the threads of the bulb and added a dot of hot glue to keep it in place.

For the hat I used the thumb of a glove. I also cut an extra strip off the thumb to make a scarf for the snowman.

I poked scissors out the top of my little hat so I could pull the ribbon through, once I put the hat on the snowman.


Then I secured the hat by adding hot glue around the edge of the hat…

And, then added a little pom-pom to the top of the hat.

Now, to put a little life in my snowman…
First, I penciled on the face to see how I liked it…

I held the scarf in place to make sure I liked where the face was going, but I didn’t actually put the scarf on until I was done painting the face and the rest of the body.
After I was done with the face, I moved on to the wreath and then the arms.
Once I had everything the way I liked it, with pencil, I painted it. Then, added my scarf with a dot of hot glue to keep it in place.

Tied a knot in the end of the ribbon, and my little snowman was ready to hang…
I think he turned out kind of cute! 🙂
When I made the snowmen for my kids, I used one of their baby socks for the hats and scarfs.

I just love ’em!

Now, my set is complete and my kids won’t fight over who, they think, I love more! 🙂
Have a great rest of the week, peeps!

Linked to these parties.

Very nice!! So your family doesn’t have any gloves or hats, but they have cute ornaments!! lol :))
LOL! I think I used a glove that we couldn’t find the match to… Maybe! 😀
Sweet ornaments! I’m going to try to find time to make some of these. Thanks 🙂
Thanks Dorothy! They are fun to make! 🙂
These are wonderful, Stephanie…beautifully created. I love them. I have created many Light Bulb ornaments in the past but none as beautiful as yours! Thank you for sharing.
Thank you, Gayle, you are so kind! Thanks for stopping by! 🙂
This is so cute! I wish I had been saving light bulbs. Thanks for the tutorial. I’m pinning it to my Christmas board.
Thanks Virginia! Thanks for visiting! 🙂
These are so precious! I know they will become heirloom ornaments! Great job 🙂
Thanks glamourpuss! I hope my children do enjoy them as they get older. I know I always love seeing the ornaments I had growing up. Thanks for stopping by! 🙂
These are ADORABLE! How clever!
Thank you, Michael Ann! 🙂
These are so cute, and I have been saving light bulbs for a craft like this. Thanks for the idea.
Glad you liked ’em Stephanie! Thanks for stopping by! 🙂
Wow. These are so cute. You did an awesome job.
Thanks Jennifer! Thanks for stopping by! 🙂
Those are absolutely adorable!!! What a great idea!!! And the pizza box?? Brilliant!! I would never have thought of something like that. I am gonna HAVE to try those!!
Thanks Sally! You are so kind! Thanks for stopping by! 🙂
super cute come see me at http://shopannies.blogspot.com
They are so cute Stephanie.
I’d love for you to share this project over at my Inspiration Party at Simply Christmas ~ http://shabbyartboutique.blogspot.com/2011/12/inspiration-friday.html
These are very cute and well-made. Thanks so much for linking up to Things I’ve Done Thursday!!
Melanie
Sew Rugged @ bear rabbit bear
bearrabbitbear.blogspot.com
Oh my goodness, these are so cute! Now I want to make some, but I will have to save it till next year. In the mean time I can save up old light bulbs.
Margaret
Thanks Margaret! Glad you liked ’em! 🙂
These are fantastic!!!
Would you be willing to submit this to the Make and Takes spotlight page? We’d love to highlight this for the M+T readers to see. (http://www.makeandtakes.com/spotlight)
AMAZING! I am going to feature this project this afternoon. Stop by and grab a button
These are just too cute…love the photo with paint all over your hands – true crafter!!
LOL! Yeah, I usually do have something all over my hands, and the pictures always come out looking like I have a booger on my finger or something! Glad you liked the snowmen! 🙂
How super adorable are they! I never would have thought of doing that with a lightbulb!
Thanks Amber! Glad you liked them! Thanks for visiting! 🙂
These are so stinkin adorable! This is definitely our ornament gift for next year! (We do one every year & have this years already picked out)
Please come link up to My Favorite Things Friday Link Party going on all week(& every Friday) but I would LOVE for you to link this cutie up! I hope you will come visit!
XoXo
~Iffy~
StayAtHomeNation.blogspot.com
So cute! I do something different with light bulbs – may do some later today and post.
Yours are adorable, like your blog too.
Found you via Flamingo Toes.
Thanks Katy! Would love to see your’s! Thanks for visiting! 🙂
Those are soooo cute! What a clever idea; I’ve never seen those before! Glad you shared them at Shine On Fridays!
I am making one for everyone!!! Too Cute
Thanks Lor! Have fun making them! Thanks for visiting! 🙂
This is so incredibly fun and colorful and THRIFTY! You did a great job with the tutorial! A lightbulb??? I would never have thought of that! I am so glad I found you through Tonia’s party! I am one of Tonia’s “monday party gals” that are mentioned above. My readers would LOVE this and love to meet you! Would love for you to head over! Either way….I am glad I found you! Love, Me http://youaretalkingtoomuch.blogspot.com/2011/12/meet-me-monday-14.html
Pingback: Light-Bulb Penguins « Lady with the Red Rocker
Those are so adorable. Would have never thought to make snowmen out of light bulbs.
P.S. I have a giveaway going on. Come over and check it out.
Jamie
http://diyhshp.blogspot.com/
Thanks Jamie!
Great idea and I love how cute they turned out! you should sell them!
http://shannonolson.blogspot.com/2011/11/childrens-art.html
Thanks Shannon! You are so kind! 🙂
These are really sweet, Stephenie! I love that you used the baby socks to decorate the snowmen you made for your kids, adds a nice, meaningful touch!
Thanks June! The socks do make them special! Thanks for visiting! 🙂
Such a good idea! And so nice instructions.
Thanks for sharing!
🙂
Thanks Ligoakama! Thanks for visiting! 🙂
Gosh those are darling and I love how you figured out how to make clothes for them!
Thanks Katie!
This is so unique and beyond cute!! I love LOVE it!! Would love for you to please share it via my Pin’Inspirational Thursday linky party please…http://theartsygirlconnection.blogspot.com/2011/12/pininspirational-thursday-11-linky.html?m=1 thanks so much :)) Wishing you a happy Thursday..~Marilyn
Very cute!! I posted a link to this on my blog: http://www.thecraftbarn-ny.blogspot.com/2011/12/crafty-friday-12911.html
Thanks,
Jennifer @ The Craft Barn
Thanks Jennifer! 🙂
This is seriously one of the cutest and most creative things that I have seen all season! Your blog is so much fun- you have some of the best ideas on here! Thanks for linking up to Strut Your Stuff Saturday! We hope that you will come back tomorrow and share more of you amazing ideas!
Camille @
SixSistersStuff
Thanks Camille! Your words are so kind! 🙂
Oh my…these are fabulous! What a great idea! I am going to be featuring this today!
Those are really cute! Thanks for sharing this idea.
Thanks for stopping by, Megacrafty! 😀
WOW I just love these !!!
Thank you C.K.! 😀
Adorable. I will have to try this out.
Pingback: 6 Easy Holiday Décor Ideas That Will Impress Any Guest - GANGUPON
Pingback: 6 Easy Holiday Décor Ideas That Will Impress Any Guest | Design News From All Over The World
Pingback: 6 Easy Holiday Décor Ideas That Will Impress Any Guest - NEWS | Phones | Nigeria Science | Technology |Computers
Pingback: 6 Easy Holiday Décor Ideas That Will Impress Any Guest | 6 Easy Holiday Décor Ideas That Will Impress Any Guest | Social Dashboard
Pingback: 6 Easy Holiday Décor Ideas That Will Impress Any Guest | Trending On IndiaTrending On India
Pingback: The Inspiration Board: link party spotlight ~27~ | homework: creative inspiration for home and life
How did you do the arms? I have made a few in the past. Love them. I started out with a penguin and a snowman of my i an design but love your twists on what I did. The pizza box is a great idea! I been looking of an idea for holding them!